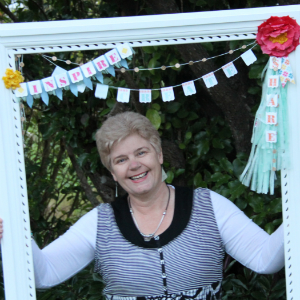
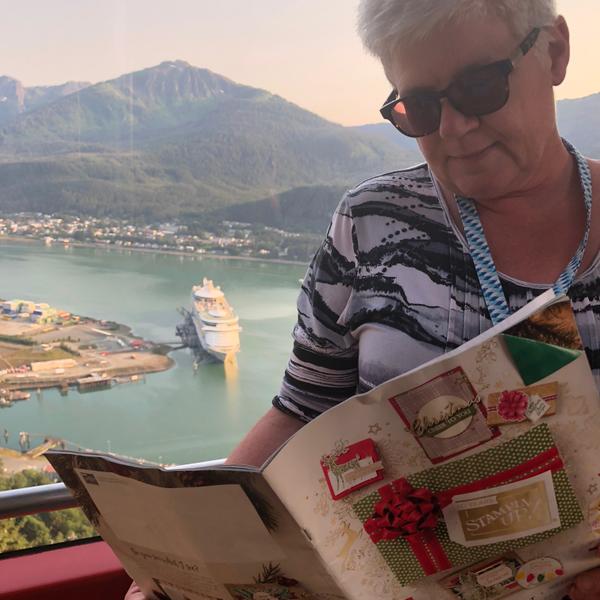
Share What You Love! Hello What an amazing trip to Canada and the United States I have just returned from.
I got to share an Alaskan Cruise with my two sisters.
It was the first time in our lives that the three of us had holidayed alone together.
We have had family holidays as children ourselves and some holidays with our husbands and families. But this was just the three of us!
#3sistersgocruising
We boarded the ship in Seattle after flying in from Auckland via San Francisco.
The itinerary saw us cruising the inside Passage with port stops at Juneau and Skagway in Alaska (USA) and at Victoria, British Columbia (Canada), along with time in the Tracy Arm Fjord looking at Glaciers.
The cruise was the Stampin' Up! Incentive Trip I
earned last year. I've said it before - but here it is again - Thank you to all the many people who helped me achieve this amazing trip!
I'm currently working hard to earn next year's Incentive Trip - a Cruise in the Greek Isles. Hubby Roy has said he'll definitely be joining me if I earn that one! And well deserved I'd say as he is always helpful,
amazingly tolerant and very supportive of my Stampin' Up! business! The trips are not the reason I do what I do - but ... they are a great incentive to keep working and a fabulous rewards to achieve!
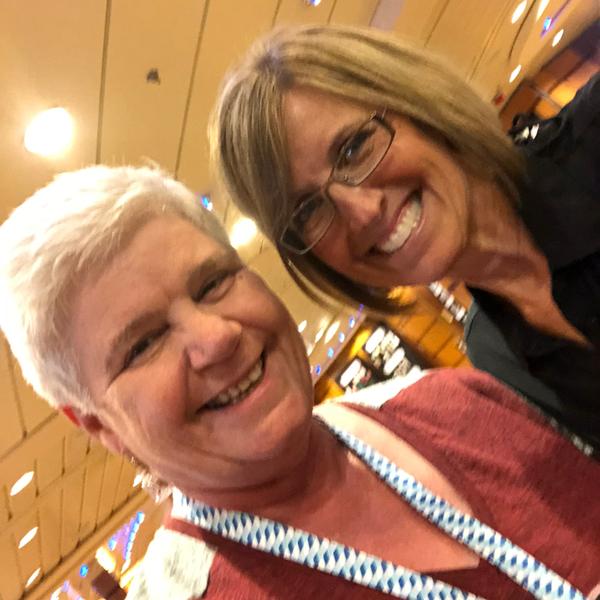
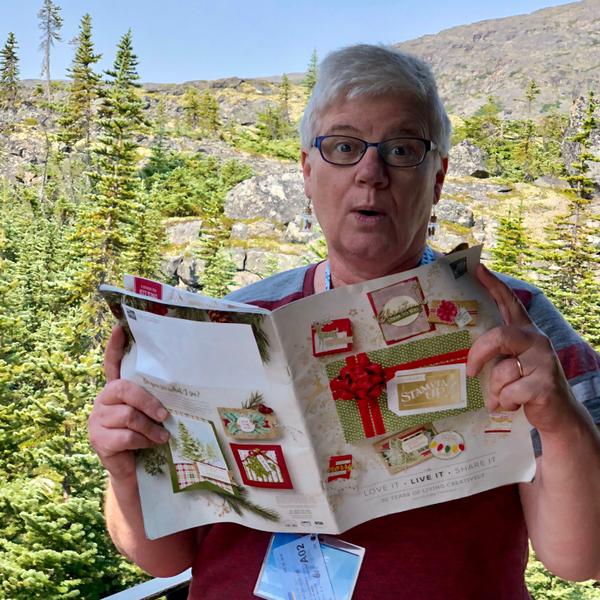
As well as stunning scenery, I got to meet up with fellow demonstrator friends from around the world. There were about 400 demonstrators on the ship and extended group (family, friends, Stampin' Up! personnel) was just over 1000!
on a ship with approximately 3200 passengers, our presence was felt! My sisters were very tolerant - I talked to lots of people!
Check into my creativejax Facebook Page at 5.30pm each day over the next week to find out more about the Cruise. I'll be sharing a little about each day on the cruise - including highlights, pillow gifts, swaps and more! After the cruise we had a weekend in San Francisco with one of my nieces. Certainly a holiday filled with lots of memories to treasure! And lots of photos to get into an album! Always good to see and talk with Stampin' Up! Founder - Shelli It was great to network with other demonstrators and I even had
some excellent brainstorming sessions about the new catalogue with some! It's great to meet and share ideas!
Since arriving home of Tuesday I've been catching up emails, prepping for class this weekend and trying to sort out my calendar for the next few months. There are so many exciting things I'd love to share - I just need to work out how to fit them all in!
In
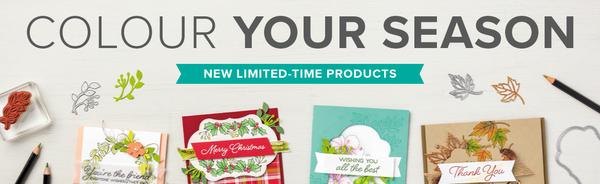
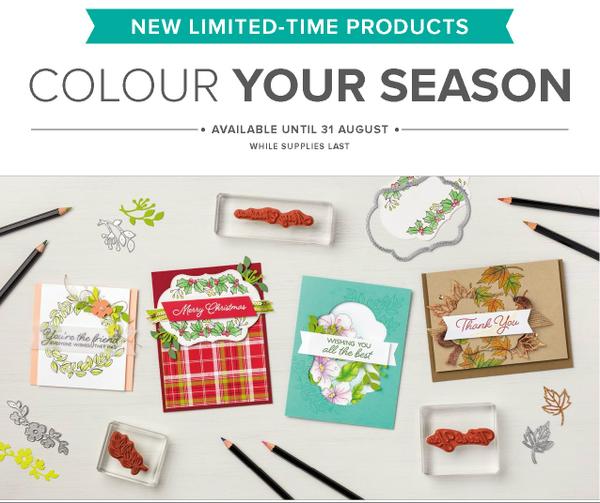
this update: - Colour Your Season - limited-edition products only available in August (while stocks last)
- Bonus Coupon Days are back - Shop in August to earn coupons you spend in September - just in time for the new Holiday Catalogue
- Holiday Catalogue Launch Parties
- Tutorial Bundle - I'm on the Design team for
another 6 months!
- PRODUCT SPOTLIGHT - Colour Your Season Suite
Thanks Jackie
|
|
|
|
The Colour Your Season suite is a set of all-new, limited-time products that are only available in August and only while supplies last. This gorgeous suite includes the Blended Seasons Stamp Set (images for every season), the
coordinating Stitched Seasons Framelits Dies (Squeal - they have stitching on both the positive and negative images) and Watercolor Pencils (ten new colours). Click on any of the links to view more details about each online. I've also got more info - including a project - further in the newsletter.
|
|
|
|
|
|
Earn Bonus Coupons in August - then spend them in September!Shopping in August just got better! For every $110 you spend (before shipping & handling), you will receive a Bonus coupon worth $11 that you can redeem in
September.
There are no limits to the number of coupons you can earn - so it's a great time to stock up on basics, or get some of the items on your wish list.
Here are all the details: - Bonus Days Earning Period
- Bonus Days Redemption Period
- Bonus Days coupon codes are only delivered via email, and only once. If lost the email cannot be resent, and the codes cannot be recovered.
- No limit to the number of coupons participants can earn.
- No limit
to the number of coupons that can be redeemed in an order during the redemption period.
- Coupons can be redeemed during the redemption period for any current retail Stampin' Up! Product (excluding Starter Kits).
- Bonus Days coupon codes can only be redeemed once.
|
|
Whitby Holiday Catalogue Launch Parties
|
|
Holiday Catalogue Launch Parties CreativeJax Homebased Studio, Observatory Close Whitby
Wednesday 5th September
10am-12noon or 7pm-9pm
RSVP to get in the draw to win a stamp set from the new catalogue! (If you have already RSVP'd, you are already in the draw!)
Cost is $10 - but there are several ways you can attend for FREE - FREE to attend for those who have purchased from me in the last 12 months
- FREE for those who attend my paid classes
- FREE for anyone who places and order of $50 or more at
the launch party.
|
|
Hawkes Bay Catalogue Launch Party
|
|
Annual Catalogue Launch Party Greenmeadows East Community Hall, Tait Drive Napier
Saturday 22nd
September 1.30pm - 3.30pm . RSVP to get in the draw to win a stamp set from the new catalogue! (If you have already RSVP'd, you are already in the draw!)
Cost is $10 - but there are several ways you can attend for
FREE - FREE to attend for those who have purchased from me in the last 12 months
- FREE for those who attend my paid classes
- FREE for anyone who places and order of $50 or more at the launch party.
|
|
Can't make a Launch Party ...
|
If you live in New Zealand and are unable to make it along to one of my New Catalogue Launch Parties, but would like to receive a copy of the new catalogue, please
|
|
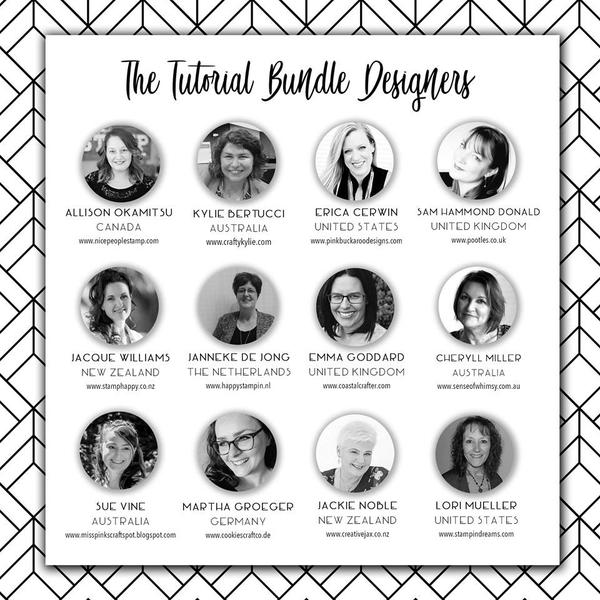
Tutorial Bundle Design Team
|
|
I am super excited - and somewhat in awe - that I get to stay on the International Design Team for the Tutorial Bundle for another six months! Werhoo!
We've had a slight name change, have new graphics and have had a few changes in the team. Check out the photo to see the amazing team I am part of! Every month this group puts together a set of pdf tutorials that are exclusive to this Bundle. We also have a monthly Blog Hop where we share another project - not the one in the Bundle. These are the ways you can get this Exclusive Tutorial Bundle with projects designed by this awesome International Team: - Join my thINK Creative Team - I share the Bundle with my Team every month
(New Zealand only)
- Make a purchase of Stampin' Up! products of $50 or more and I will send you the Tutorial Bundle for FREE (New Zealand only)
- Purchase the Tutorial Bundle - new Bundle every month - $NZ20 (available to purchase from me anywhere in the world)
- Purchase a six month subscription to the Tutorial Bundle - $NZ100 (available to purchase from me
anywhere in the world). You pay for 5 months but receive all 6 months of Tutorial Bundles.
ps - if you purchase any of the Colour Your Season stamp sets, framelits or bundles you will qualify to get this month's Tutorial Bundle for FREE!!!
|
PRODUCT SPOTLIGHT Colour Your Season Suite
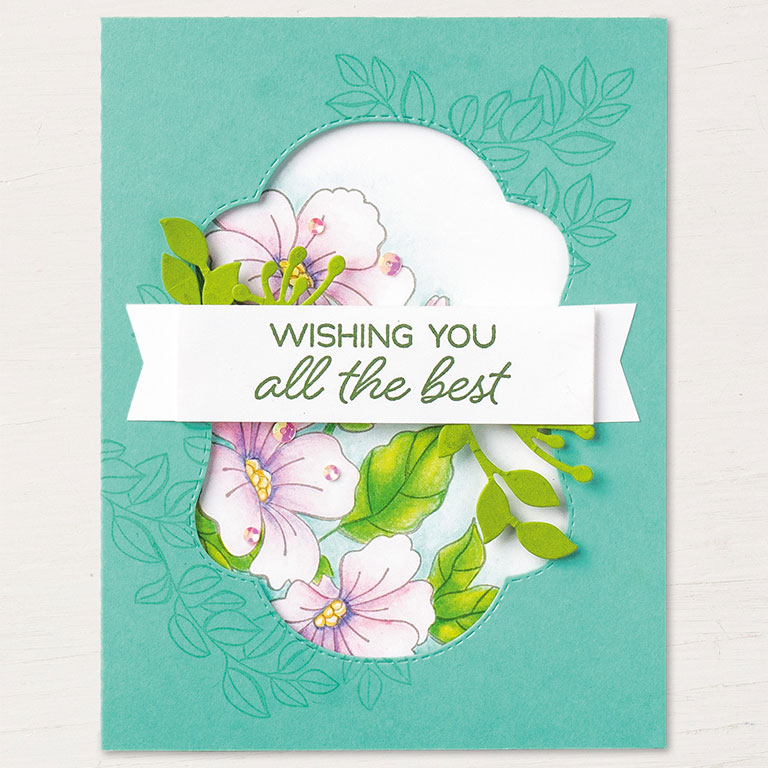
This suite is perfect for creating a huge range of projects.
The three components
- Colour Your Season stamp set,
- Stitched Season framelits
- Watercolour Pencils
work fabulously together - but each is individually also a great stand-alone product.
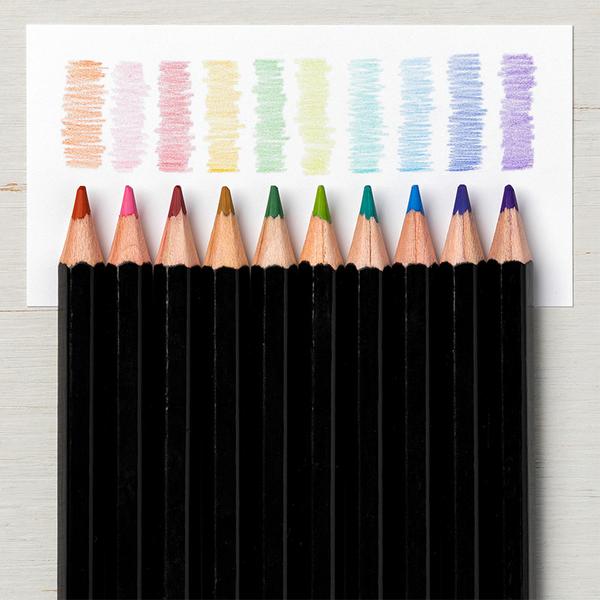
Let's look at each. First up - the Watercolour Pencils.
Now in even more colours - 10 in fact - these high-quality, smooth colour pencils are perfect for creating watercolour stamped images. Use with Aqua Painters, Blender Pens, or alone. They work beautifully with the Blended Season stamp set. They are also Acid and Lignin Free
The colours in this assortment complement the
colours already available in the Annual catalogue. The colours are: Balmy Blue, Cajun Craze, Cherry Cobbler, Coastal Cabana, Crushed Curry, Flirty Flamingo, Garden Green, Gorgeous Grape, Granny Apple Green, Night of Navy.
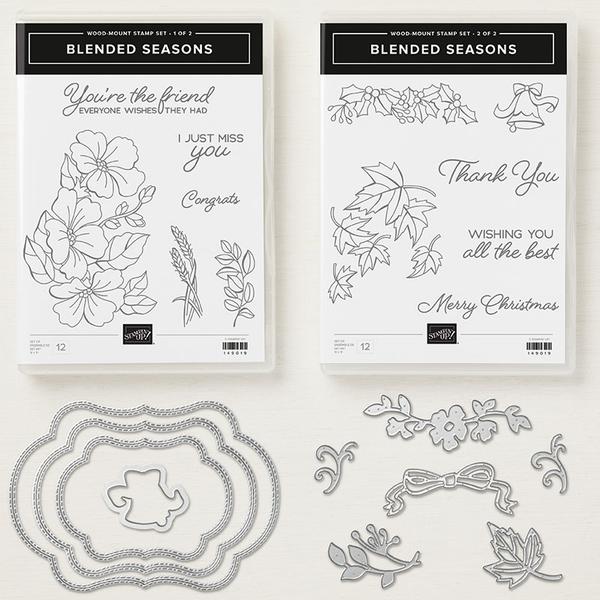
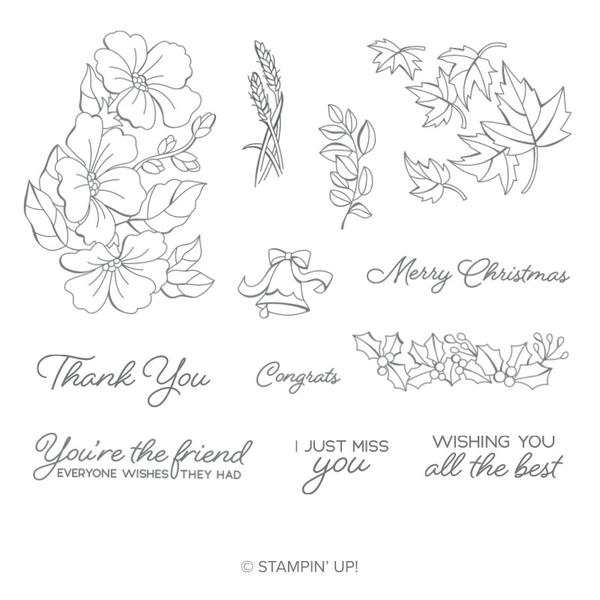
Next up - let's take a look at the Blended Season Stamp Set
As the name suggests - there's a stamp for any season in this set! But not only do the images work for different seasons - they also cover a huge range of card giving reasons - from Christmas to wedding to Get Well to Thanks and most things in between! The different
images and sentiments fit so well onto the different sized dies in the Stitched Seasons Framelits. And of course those images are perfect for colouring. It could be with the Watercolour Pencils or Stampin' Blends or Aqua Painters. So much choice!
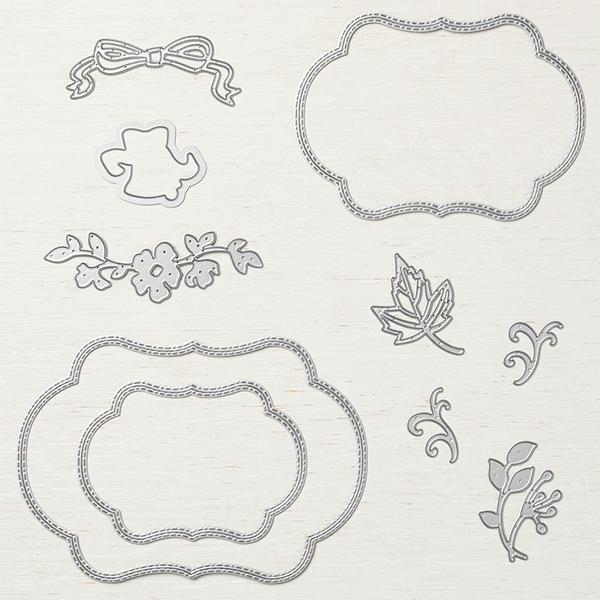
The third item in the Suite are the Stitched Season Framelits - WOW - just
WOW!
I'm in love with these framelits! Just one of the dies - the Bell shape - actually cuts out a stamped image from the Blended Seasons Stamp Set. The others are stand-alone dies - though of course they co-ordinate beautifully with the other stamped images and
sentiments.
I'm particularly fond of the decorative shaped panels. Three sizes means lots of versatility and they that mat so well together. Look closely at the shaped panels - the cutting and stitching configuration means when the panel is cut you get stitching around the panel itself - AND stitching around the outside of the "negative" space left behind!!! You can see that in the images below.
Remember - these are only available in August - and only while supplies last.
Now - a project for you.
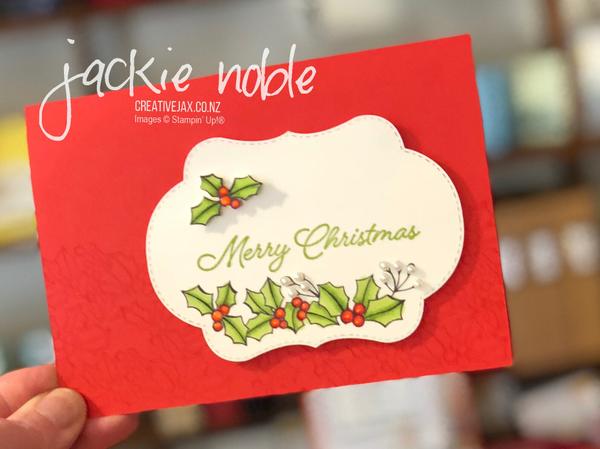
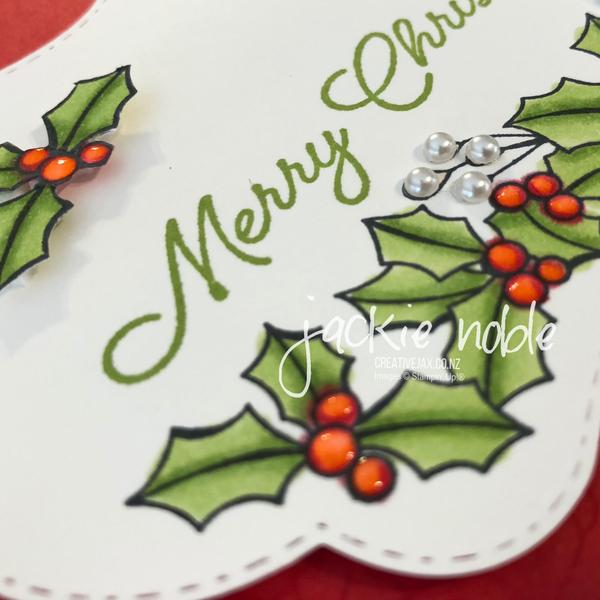
I shared this project on my blog as part of the CASEing the Catty Blog Hop a couple of weeks ago. If you haven't read it you can check it out HERE Here are the instructions to create this bright Christmas Card
Bundles: Blended Seasons Stamp Set + Stitched Seasons Framelits (wood: 149893, clear: 149894)
Ink: Tuxedo Black Memento Ink Pad (132708) Granny Apple Green Stampin' Pad
(147095) Versamark Pad (102283)
Card/Paper: Poppy Parade A4 Card Stock (121694) Whisper White A4 Card Stock (106549)
Accessories: Basic Pearl Jewels (144219) Fine-Tip Glue Pen (138309) White Stampin' Emboss Powder (109132)
Tools: Big Shot Die-Cutting Machine
(143263) Granny Apple Green Stampin' Blends Marker Combo Pack (147274) Poppy Parade Stampin' Blends Marker Combo Pack (147275)
Mini Stampin Dimensionals (144108)
Stampin' Dimensionals (104430)
Instructions: - Cut Poppy Parade card stock at 21 cm x 14.8 cm, score at 10.5 cm and fold card base in half. Stamp Holly image onto card front using Versamark Ink Pad
- Die-cut stitched panel out of Whisper White card stock, and stamp holly branches along the bottom in Momento Black Ink. Colour the
leaves with Light and Dark Granny Apple Green Stampin' Blends. Colour the berries in the centre of each sprig with Light and Dark Poppy Parade Stampin' Blends. Stamp the Sentiment in Granny Apple Green. Add the stitched panel to the card front using Stampin' Dimensionals.
- Stamp holly branches onto a scrap of Whisper White Card Stock in Momento Black Ink. Colour the leaves with Light and Dark Granny Apple Green Stampin'
Blends. Colour the berries with Light and Dark Poppy Parade Stampin' Blends. Fussy cut out one sprig and add to the front panel using mini dimensionals.
- Place a droplet of glue from the Fine-Tip Glue Pen onto the red berries.
- Place a Basic Pearl Jewel on each of the uncoloured berries.
If you like this project and need some or all of the above materials to create it, email me at [email protected]
|
Jackie Noble | CreativeJax |
|