Stamps/Ink:
No stamps or Ink Required
Paper (including cutting
dimensions):
Santa’s Workshop Specialty Designer Series Paper (147809): 7" x 5" ( 17.8cm x 12.7cm)
Accessories:
Santa’s Workshop Memories & More Card Pack (147905)
Santa’s Signpost Framelits Dies (147911)
Santa’s Workshop Enamel Shapes (147811)
Big Shot Die-Cutting Machine (143263)
Shimmery White Embossing Paste (145645)
Tear & Tape (138995)
Stampin’ Dimensionals (104430)
Non-Stampin’ Up! items:
Frame to fit 7" x 5" ( 17.8cm x 12.7cm)
INSTRUCTIONS
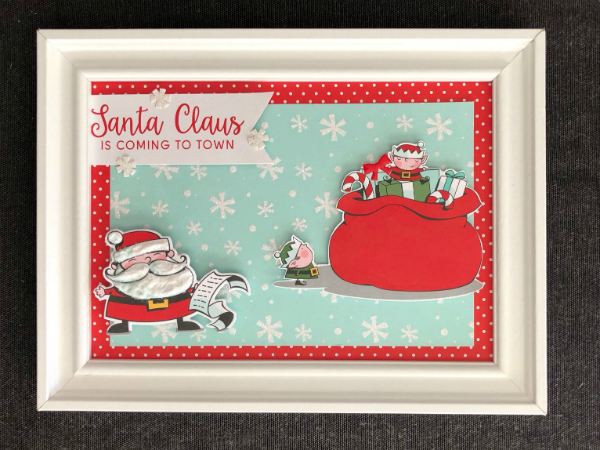
- In the Memories & More Card Pack, locate the 6”x4” card with the image of the Christmas Elves and Santa Sack. Fussy cut the image out.
- In the Memories & More Card Pack, locate the 6”x4” card with the image of Santa Sack and his list. You could fussy cut the image – but there is a framelit in the Santa’s Signpost die set that fits him perfectly – so no fussy cutting for Santa! Cut Santa out with the
co-ordinating die.
- Apply Shimmery White Embossing Paste to Santa’s Hat and beard. Leave to dry. (see image below)
- From the same card cut the “Santa Claus is coming to town” Sentiment. Flag the end.
- Choose a sheet from the Santa’s Workshop Specialty DSP to use as a background pattern. Cut a piece at 7” x 5”
- In the Memories & More Card Pack, locate the blue 6”x4” card with sparkling white snowflakes. Use Tear & Tape to attach the Blue card to the DSP.
- Use Stampin’ Dimensionals (single layer) to attach the Elves & Santa Sack image to the background as shown.
- Use stacked Stampin’ Dimensionals (double layer) to attach Santa to the background. Extra height is achieved by stacking two dimensionals on top of each other.
- Attach sparkly snowflake stickers from the Memories & More Card Pack onto the sentiment.
- Attach red bow from the Santa’s
Workshop Enamel Shapes to present in the Santa sack.
- Place into the frame.